Open topic with navigation
Managing Submissions
When registrations begin, there are a number of things you can do to manage submissions. Each item will be covered one by one.
Viewing submissions
Want to keep an eye on your submitted forms? You can do this directly from the WebLink tab.
To view submissions
- Click WebLink > Event Registration > View Submissions. The Submitted Forms grid appears.
- Select the form to work with from the Form drop‐down list.
- Optionally, if the form has more than one schedule or date/time, select the one you want to work with from the Schedule/Time drop‐down list. If you leave this field blank, all submissions will appear regardless of which schedule was selected.
- Click Search. All submissions for the selected from appear.
If there are multiple pages of results, links to additional pages will appear at the top of your list. The alpha bar at the top of the results list allows you to quickly navigate to the last name of any individual you want to view. For example, to see forms submitted by people with the last name Smith, click the “S” in the alpha bar.
- Click View Summary beside any form to see the details of the submission.
Adding submissions for people who do not have Internet access or want to pay by cash/check
What do you do when people want to register for an event but do not have a way to access the Internet? Or, what if you have people who would rather pay by cash or check? You can add a registration for them!
To add a registration/submission
- Click WebLink > Event Registration > View Submissions. The Submitted Forms grid appears.
- Click the Add link in the upper‐right corner of the grid. The Add Submission form appears.
- Click Find Person in the middle of the page. The advanced search dialog box appears.
- Type a name or partial name into the Name field and click Search. A list of possible search results appears. Click Select beside the person to work with. The Add Submission form appears with the person’s information populated.
- Select the form to work with from the Form drop‐down. You can even select aggregate forms here.
- Click Add Submission. The household listing appears just as it appears when registering from the church website.
- Click Select beside the person to register and complete the registration as normal.
- On the Checkout page, you will notice that the Payment Method drop‐down list contains two additional payment types ‐ Check and Cash. These are only available by going through Fellowship One as described in the steps above.
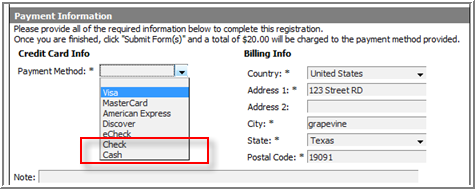
- Choose the appropriate Payment Method and complete all required fields.
- Click Submit Form(s). The submission is complete.